Windows Create Iso Image
1 Standard W10 ISO
1) Clean install Windows on your reference machine (physical or vm) with the latest available build install media
2) When on Desktop, opt in for Insider Fast Ring build upgrades (tutorial), restart
3) Let the vm or physical machine stay on, it will soon pick the latest Fast Ring build upgrade (although often getting upgrade immediately, it in some cases might take up to 48 hours online time. The less you let machine to be off and offline, the sooner you will get the upgrade).
4) Restart Windows in Audit Mode with following command in Command Prompt:
%windir%\system32\sysprep\sysprep.exe /audit /reboot
5) Windows will now restart in Audit Mode using built-in administrator account. You will see a Sysprep prompt in the middle of display:
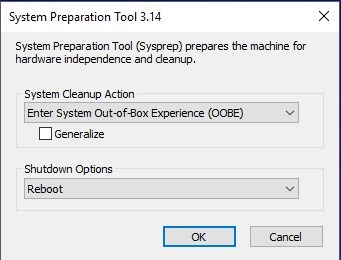
Leave it open for now.
6) Delete all existing user accounts and their user profile data (Option One in this tutorial), uninstall all possibly installed third party software
7) You are at the moment signed in using Windows built-in administrator account. In File Explorer, open C:\Users\Administrator folder and check that all user folders are empty deleting all possibly found content
8) Run Disk Clean-up, selecting and removing everything possible (tutorial).
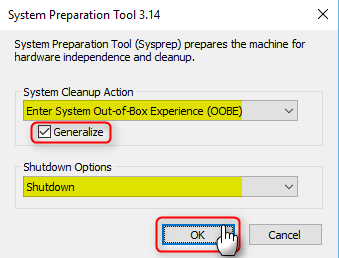
9) When clean-up is done, in Sysprep dialog select System Cleanup Action: Enter System Out-of-Box Experience (OOBE), select Shutdown Options: Shutdown, select (tick the box) Generalize, click OK:

10) Sysprep will now prepare Windows, shutting down machine when done:

11) If using Hyper-V vm, create a checkpoint when Windows has shut down after Sysprep. Continue from Part Four below
2 Custom W10 ISO with pre-installed software & pre-set user accounts
1) Create all user accounts you want to, signing once in to each account to create profile folders. Sign out from all new user accounts, sign in to your main local admin account
2) Install / uninstall software as you prefer, update Windows fully.
3) Run Extended Disk Clean-up, selecting and removing everything possible (tutorial)
4) Shut down the PC
5) Continue from Part Four below
3 Custom W10 ISO with pre-installed software, no user accounts
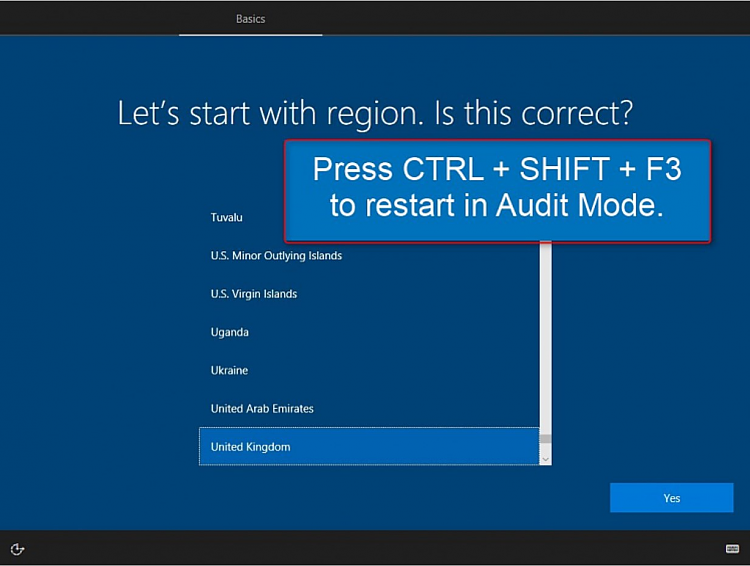
1) Clean install your preferred Windows 10 build on your reference machine, a Hyper-V or other virtual machine or a spare physical computer. When installation stops first time after installation to wait user input, do not click anything. Instead, press CTRL + SHIFT + F3 to restart Windows in Audit Mode:
Alternatively follow steps 1.1 to 1.7 in Part One above, continue then from step 2 below
2) Reconnect Ethernet / WiFi (physical machines) or external switch (Hyper-V virtual machines) to get Internet connection
3) Install your preferred software, customise and personalise Windows, remove / add Start tiles as you wish (see Part Six Step 6.1), set your preferred group policies (group policies not available in Home and Single Language editions). Do not run any program you install!
Notice that software installed now will be included in ISO install media, and will be pre-installed for all users on each computer you install Windows to using this custom ISO
4) Open Notepad, paste the following code to it, save it as File name: unattend.xml (exactly this name!) and Save as type: All files (important!) in C:\\Windows\\System32\\Sysprep folder
64 bit Windows:
<?xml version="1.0" encoding="utf-8"?>
<unattend xmlns="urn:schemas-microsoft-com:unattend">
    <settings pass="specialize">
        <component name="Microsoft-Windows-Shell-Setup" processorArchitecture="amd64" publicKeyToken="31bf3856ad364e35" language="neutral" versionScope="nonSxS" xmlns:wcm="http://schemas.microsoft.com/WMIConfig/2002/State" xmlns:xsi="http://www.worg/2001/XMLSchema-instance">
            <CopyProfile>true</CopyProfile>
        </component>
    </settings>
</unattend>
32 bit Windows:
<?xml version="1.0" encoding="utf-8"?>
<unattend xmlns="urn:schemas-microsoft-com:unattend">
    <settings pass="specialize">
        <component name="Microsoft-Windows-Shell-Setup" processorArchitecture="x86" publicKeyToken="31bf3856ad364e35" language="neutral" versionScope="nonSxS" xmlns:wcm="http://schemas.microsoft.com/WMIConfig/2002/State" xmlns:xsi="http://www.worg/2001/XMLSchema-instance">
            <CopyProfile>true</CopyProfile>
        </component>
    </settings>
</unattend>
This so called answer file will be read for instructions when we run Sysprep (Windows System Preparation Tool) later on. This answer file is about as small as possible, the only component included in it is called CopyProfile which when set to TRUE copies all theme / desktop / Start tile and so on personalisations to default user profile, which will then be used as base profile whenever a new user profile will be created.
5) Sysprepping with the Generalize switch as we will soon do, with component CopyProfile set to be TRUE in answer file has a small issue or rather a small inconvenience: it leaves the last used user folders and recent files of built-in admin to end user’s Quick Access in File Explorer.
To fix this, to reset Quick Access to defaults whenever a new user signs in first time, we need to run a small batch at first logon of new user, then remove the batch file itself from user’s %appdata% so Quick Access will not be reset on any subsequent logon.
Open an elevated (Run as administrator) Notepad (Notepad must be elevated to save in system folders), paste the following code to it, save it as File name: RunOnce.bat (or any name you prefer, with extension .bat) and Save as type: All files (important!) in %appdata%\Microsoft\Windows\Start Menu\Programs\Startup folder
echo Y|del %appdata%\microsoft\windows\recent\automaticdestinations\*del %0
The batch file explained:
- echo Y | = Pipes (sends) a letter Y to the command given after the Pipe (|) character
- del %appdata%\microsoft\windows\recent\automaticdestinations* = Resets the Quick Access to defaults. This command expects the user to enter either Y for Yes or N for No. As the Y will be in this case piped, user interaction is not needed but instead the Y will be entered automatically
- del %0 = Deletes the batch file itself after it has been run. Leaving this away, not deleting the batch file, would reset the Quick Access every time the user signs in
6) Run Disk Management. Shrink C: partition with 10 to 15 GB, create a new partition using the freed space. This partition will be used later to store the captured image. Rename Windows partition as Windows, and the new image partition as Image. Create a new folder in this new partition, name the folder as Scratch. Later on when we boot reference machine from install media to capture image with DISM command, this folder will be needed to offer DISM enough temporary working space
7) Delete all possible downloaded software installers and imported assets from File Explorer > Quick Access > Downloads folder. Run Extended Disk Clean-up, selecting and removing everything possible (tutorial)
Hyper-V users, when disk has been cleaned create a checkpoint
8) In Sysprep dialog still open on your desktop, select System Cleanup Action: Enter System Out-of-Box Experience (OOBE), select Shutdown Options: Shutdown, select (tick the box) Generalize, click OK:
9) Sysprep will now prepare Windows, shutting down machine when done. Continue from below (Part Four):

4 Capture Windows image (create custom install.wim)
1) Boot the PC with Windows 10 install media. Use as recent install media as possible to ensure that DISM is most recent possible! In my case now, doing build 14986 ISO now, the most recent ISO / install media was build 14971.
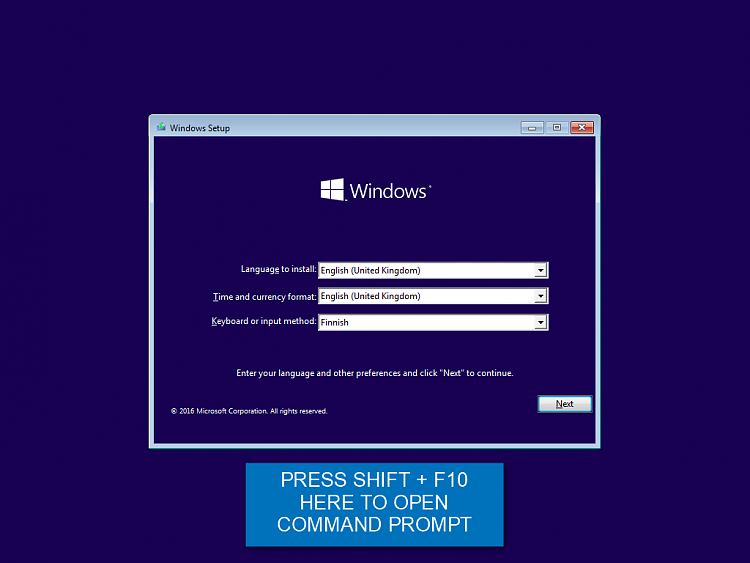
2) When you arrive the region and format selection, press SHIFT + F10 to open Command Prompt:
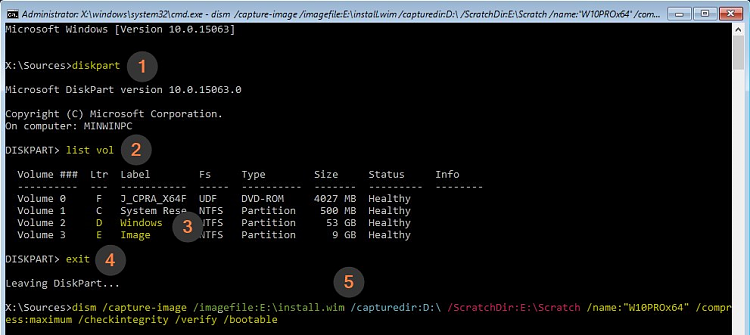
3) Enter command diskpart, press Enter (#1 in screenshot after step 4.4), enter command list vol (#2)
This lists all volumes on your hard disks. Find the drive letters for your Windows system partition (in recovery console it’s not always C!), and for the volume (disk / partition) where you want to write (store) the new customised install.wim file. You can capture image on any internal or external disk / partition as long as it is big enough to store the captured Windows image (it will be at least 5 GB and might be as big as 20 GB, depending on software installed).
In my case now it is easy because I have labeled my partitions (tutorial) with clean and understandable names. I want to capture Windows from volume D labelled as Windows and create the new install.wim in volume E labelled as Image (#3).
Exit diskpart with command exit (#4).
4) Enter the following command to create a new install.wim file (#5):
dism /capture-image /imagefile:E:\install.wim /capturedir:D:\ /ScratchDir:E:\Scratch /name:"AnyName" /compress:maximum /checkintegrity /verify /bootable
In case copying the code from above CODE box is difficult, here’s the command also in QUOTE box for easier copy & paste:
dism /capture-image /imagefile:E:\install.wim /capturedir:D:\ /ScratchDir:E:\Scratch /name:"AnyName" /compress:maximum /checkintegrity /verify /bootable
Replace drive letter E in imagefile switch (green highlight in screenshot) with the drive letter and folder path of the target drive where you want your custom install.wim be written (saved), drive letter D in capturedir switch (blue highlight) with the Windows system partition, and temporarily working folder Scratch path (see step 3.6) with correct path as shown by diskpart in step 4.3:
The name given in /name switch in above command is irrelevant, we will name the ISO later on. Use any name you want to.
5) Notice that this will take time, go get something to eat or a beer or whatever ;)
On my low end laptop this takes over 40 minutes, first half of it without any whatsoever progress indicator. On a mid level desktop it took today half an hour. DISM works somewhat faster if you don’t use optional switches /checkintegrity and /verify but I would not recommend you to create install.wim without checking its integrity and verifying it.
Don’t panic! When done, restart the reference machine normally booting to desktop and jump to Part Five
Steps 4.6 through 4.13 for virtual machine users only:
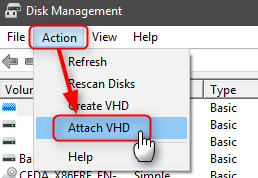
6) On your host machine, open Disk Management (right click Start > Disk Management)
7) Select Attach VHD from Action menu:
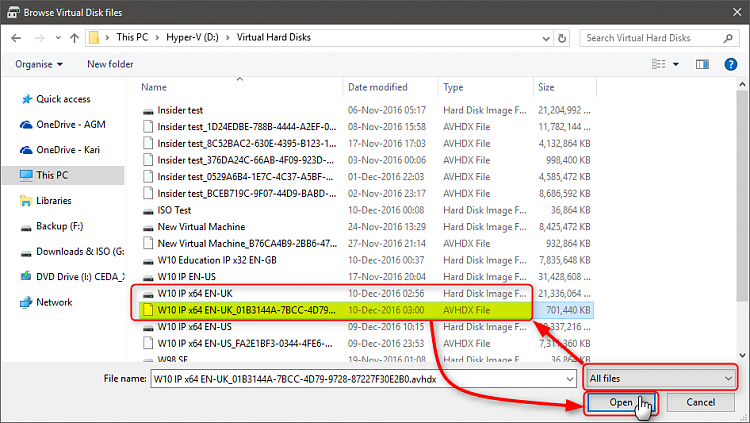
8) Browse to and select your reference virtual machine’s VHD / VHDX file. If you have any checkpoints (AVHD / AVHDX files) created on this vm, select the one with most recent time stamp. Notice that you have to select show all files to be able to see checkpoint AVHD / AVHDX files:
9) Select (tick the box) Read-only (this is very important!), click OK:
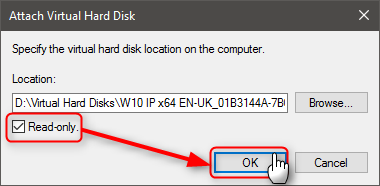
Forgetting to select Read-only will especially when mounting a checkpoint AVHD / AVHDX file make it unusable for Hyper-V; you can use it for purpose of this tutorial but not boot the vm anymore in Hyper-V.
10) Windows mounts the virtual hard disk, all its partitions as separate disk. In case of an MBR disk it even mounts the system reserved partition. Open the Windows system partition VHD to be sure that’s the one where Windows is installed, note the drive letter your host assigned to it:

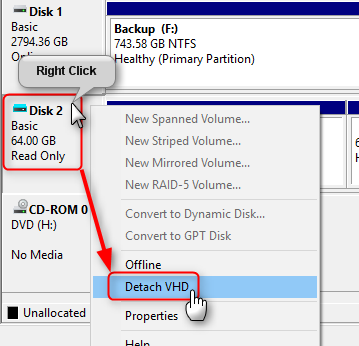
11) When done, detach the VHD / VHDX or AVHD / AVHDX file from host by right clicking it in Disk Management and selecting Detach VHD:
5 Create a bootable ISO
1) Mount a recent official Windows 10 ISO you have as a virtual DVD with double click. I used an official Windows 10 version 1607 build 14393 ISO downloaded from Microsoft today when creating customised build 14986 ISO (EDIT: now three months later I used the same 14393 ISO when creating my own Insider Build 15055 ISO).
Copy its content (everything) to a folder on any internal or external hard disk.
I always name this folder as ISO_Files. Alternatively copy the contents of a Windows 10 install USB or DVD to ISO_Files.
2) Browse to your custom install.wim created earlier in Part Four. Copy it to Sources folder under ISO_Files folder, replacing the original install.wim:
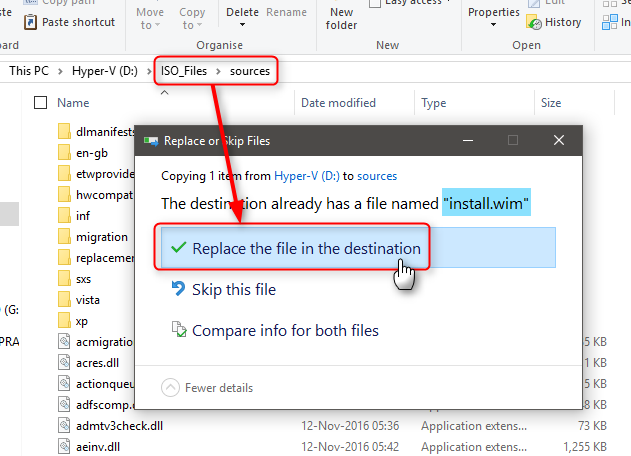
If the ISO you used in step 5.1 to get ISO files is made with Windows Media Creation Tool, the ISO_Files\Sources folder contains an install.esd file instead of install.wim.
In this case you will naturally not get “File exists” prompt. Simply delete the install.esd file and paste your custom install.wim to replace it.
3) If your host machine is not opted in to Insider builds, download the latest Windows Assessment and Deployment Kit (ADK) for Windows 10: Windows ADK downloads - Windows Hardware Dev Center
If your host has pre-release Windows Insider build installed, download Windows Insider Preview ADK instead: Windows Insider Preview ADK
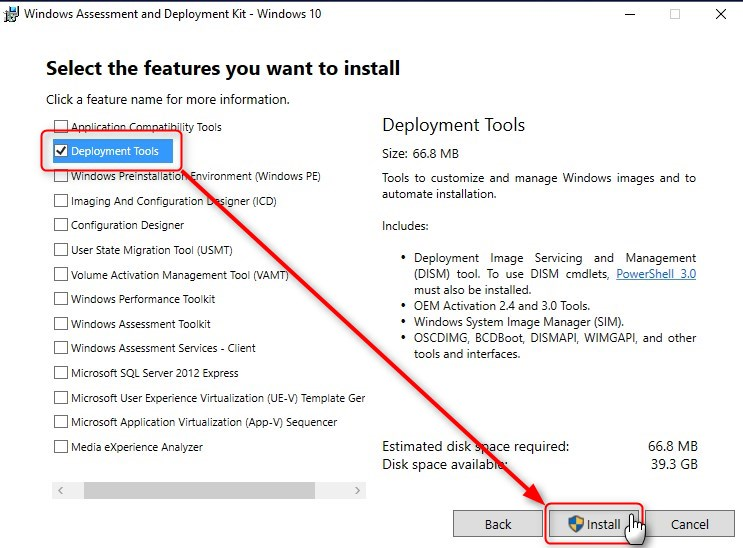
Full download of ADK is about 7.5 GB but luckily we only need Deployment Tools. Unselect everything else and click Install:
4) Start elevated (right click > More > Run as administrator) Deployment and Imaging Tools interface:

5) The path shown in prompt is annoyingly long. To shorten it and jump to root of drive C:, type cd\ and hit Enter. The cd command (abbreviation from Change Directory) changes the current working folder (directory), in this case to root of current drive (backslash \ = root, two dots .. = up one level).
Enter the following command:
oscdimg.exe -m -o -u2 -udfver102 -bootdata:2#p0,e,bd:\iso_files\boot\etfsboot.com#pEF,e,bd:\iso_files\efi\microsoft\boot\efisys.bin d:\iso_files d:\14986PROx64.iso

Replace three instances of d:\iso_files (green highlight in above code box and screenshot) with drive and folder where you copied Windows installation files. Notice that this is not a typo: first two of these instances are typed as argument for switch -b without a space in between the switch and argument, to tell oscdimg command where to find boot files to be added to ISO.
Replace d:\14986PROx64.iso (highlighted red) with drive and path where you want to store the ISO image plus your preferred ISO file name.
Although the command seems a bit complicated, everything in it is needed. See more about oscdimg command line options: Oscdimg Command-Line Options